 Pin It
 I'll never forget the Easter afternoon when my daughter rushed into the kitchen, eyes wide with excitement, asking if we could make something that looked like a bunny. I laughed at first—how could we possibly sculpt a rabbit from food?—but then inspiration struck. That's when The Bunny Silhouette was born, a playful platter that turned a simple gathering into pure magic. Now, whenever spring arrives, my family asks for it by name.
What I love most is watching people's faces when they realize the bunny is completely edible and filled with familiar, comforting flavors. My sister brought it to her daughter's school potluck, and it became the dish everyone wanted the recipe for—even the parents couldn't stop snacking on those creamy mozzarella balls and bright strawberry bites.
Ingredients
- Large sheet parchment paper or serving platter: This becomes your canvas—the foundation that holds everything together and makes presentation effortless.
- Black olives (1 cup, whole or sliced): These create the bunny's outline and give you a chance to taste the salty, briny contrast that makes every bite more interesting.
- Diced strawberries (1 cup): They're the jewels of the pink filling—sweet, slightly tart, and full of spring energy.
- Diced watermelon (1 cup): This adds a refreshing, crisp texture that keeps the platter from feeling too heavy.
- Pink beet hummus (1 cup): The secret ingredient that ties the pink section together with creamy, earthy richness.
- Radish slices (1/2 cup): They bring a peppery snap and beautiful color variation to the pink fillings.
- Mini mozzarella balls (1 cup): Soft, mild, and absolutely addictive—they become little bites of comfort in the white section.
- Cottage cheese, drained (1 cup): This creates a creamy base that holds textures together beautifully.
- Hard-boiled eggs, sliced (2): They add protein and a familiar richness that grounds the whole platter.
- Cauliflower florets (1 cup): These offer a satisfying crunch and help define the bunny's face with their white color.
- Fresh chives, finely chopped (1 tablespoon): They become delicate whiskers and add a gentle onion flavor that brightens everything.
- Small piece of carrot: The nose—a nod to what bunnies actually love, placed right where it belongs.
- Blueberries (2): Two little eyes that bring the bunny to life and add a sweet, tart note.
Tired of Takeout? 🥡
Get 10 meals you can make faster than delivery arrives. Seriously.
One email. No spam. Unsubscribe anytime.
Instructions
- Set up your workspace:
- Lay out your parchment paper or serving platter on a flat surface where you have room to work. This is your stage, so take a moment to make sure everything feels right. I like to have all my ingredients prepped and in small bowls nearby—it makes the building process feel like a creative play rather than a scramble.
- Create the bunny outline:
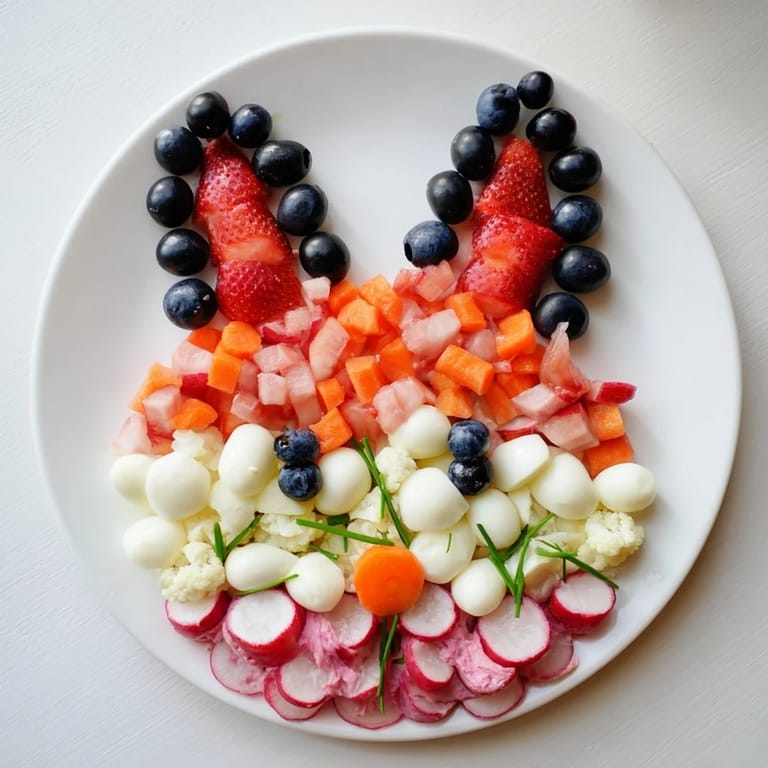
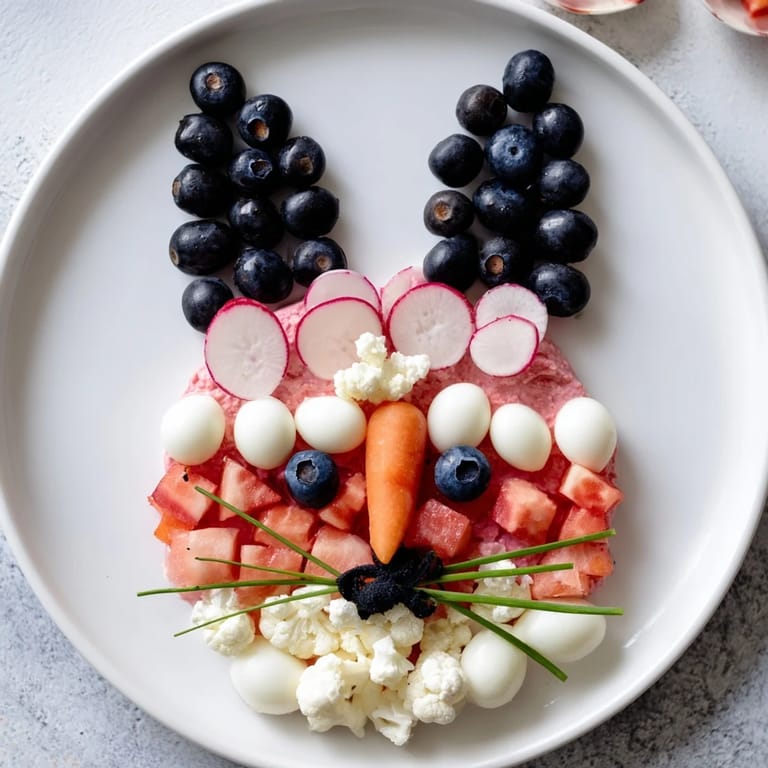
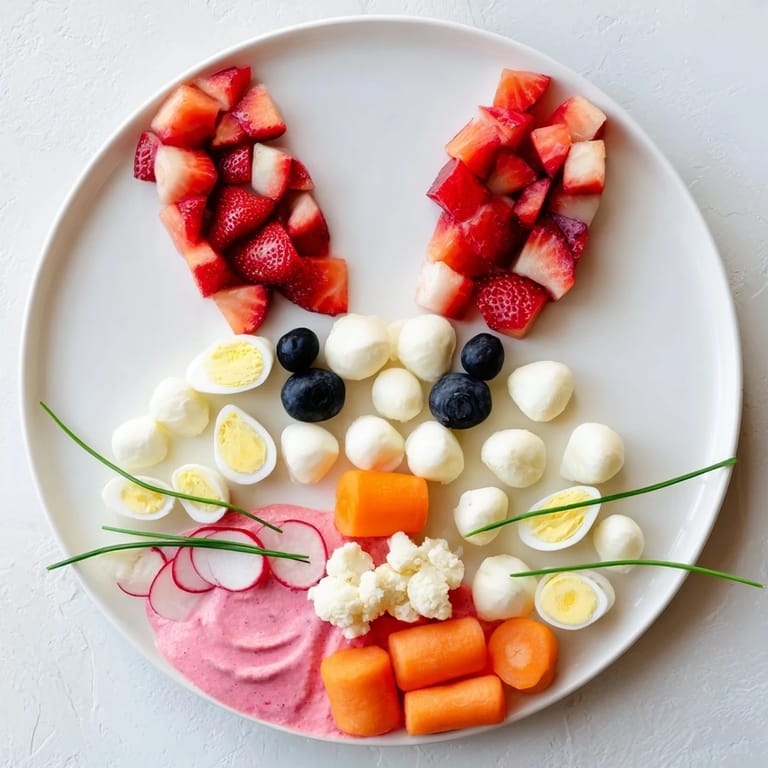
- Using black olives, arrange them across your platter to form a clear silhouette of a rabbit head and long ears. Step back and look at it—does it feel like your bunny? Don't worry if it's not perfect; quirky ears have their own charm. This outline is your guide, so take your time here.
- Fill the ears with pink magic:
- In the ear sections you've outlined, begin layering your pink ingredients: strawberries, watermelon, radish slices, and beet hummus. Vary the arrangement so colors dance across the ears. Mix the textures as you go—smooth hummus next to crisp radish, sweet strawberry against refreshing watermelon. This is where the platter becomes truly beautiful.
- Fill the face with creamy white:
- Move to the bunny's face and begin placing mozzarella balls, cottage cheese dollops, hard-boiled egg slices, and cauliflower florets. Think of this like adding gentle clouds to a sky. The whites should feel light and approachable, inviting people to take that first bite.
- Bring the bunny to life:
- Place your two blueberries where the eyes should be—this moment is magical, I promise. Position your carrot piece as the nose, right in the center of the face. Now take your finely chopped chives and scatter them above the face like delicate whiskers. Step back and admire what you've created.
- Chill and serve:
- If you have time, refrigerate the platter for an hour or so—this helps everything set together beautifully. When you're ready to serve, bring it to the table and watch the joy on people's faces. Crackers or vegetable sticks on the side make it complete.
 Pin It
 There was a moment during my niece's birthday party when a shy four-year-old who usually sits quietly in the corner walked straight up to The Bunny Silhouette, pointed with wonder, and said, 'It's so happy.' That's when I realized this platter isn't just about pretty food—it's about creating memories and giving people a reason to pause and smile together.
Why This Platter Works for Any Gathering
The Bunny Silhouette succeeds because it's inclusive without being complicated. Vegetarian, naturally gluten-free if you skip the crackers, easily adaptable for vegan guests—it meets people where they are while still feeling festive and intentional. I've learned that the best dishes are the ones that don't make anyone feel left out, and this one does exactly that.
Swapping Ingredients to Match Your Pantry
One of my favorite discoveries was realizing that raspberries work beautifully in place of strawberries, adding a slightly deeper color and more delicate texture. Pink grapefruit segments bring tartness and elegance. For the white elements, cream cheese mixed with fresh herbs creates a different flavor profile that's equally wonderful. The beauty of this recipe is its flexibility—it invites you to make it your own.
Making It Work for Different Diets
I've made dairy-free versions using cashew cream and vegan cheese, and honestly, they're just as delicious. The platter's magic comes from color and contrast, not from specific ingredients. If you're serving to a group with mixed dietary needs, this is your solution—simply substitute as needed and the bunny remains just as charming. Every version becomes a love letter to your guests.
- Vegan cheese alternatives work beautifully and melt just slightly in your mouth.
- Serve with gluten-free crackers for those who need them—no one will notice the difference.
- This platter actually invites customization, so feel free to swap in whatever ingredients excite you.
 Pin It
 The Bunny Silhouette taught me that sometimes the most memorable dishes aren't complex—they're just full of heart. Make this when you want to celebrate something, or when you simply want to bring a little springtime joy to your table.
Recipe FAQs
- → How do you create the bunny outline?
Use whole or sliced black olives arranged on parchment paper or a platter to form the bunny's head and ears shape as a clear outline.
- → What ingredients give the silhouette its pink and white colors?
Pink tones come from diced strawberries, watermelon, beet hummus, and radish slices, while whites are rendered by mini mozzarella balls, cottage cheese, hard-boiled eggs, and cauliflower florets.
- → Can this dish accommodate dietary restrictions?
Yes, it’s vegetarian and gluten-free. For dairy-free, replace cheese with vegan alternatives, and substitute fruits if needed.
- → How should this platter be served and stored?
Chill until serving to keep ingredients fresh and firm. Serve with crackers or vegetable sticks for added crunch.
- → Are there alternatives for the decorative elements?
Blueberries are used for eyes, a small carrot piece for the nose, and finely chopped fresh chives for whiskers; substitutions can be made based on availability.