 Pin It
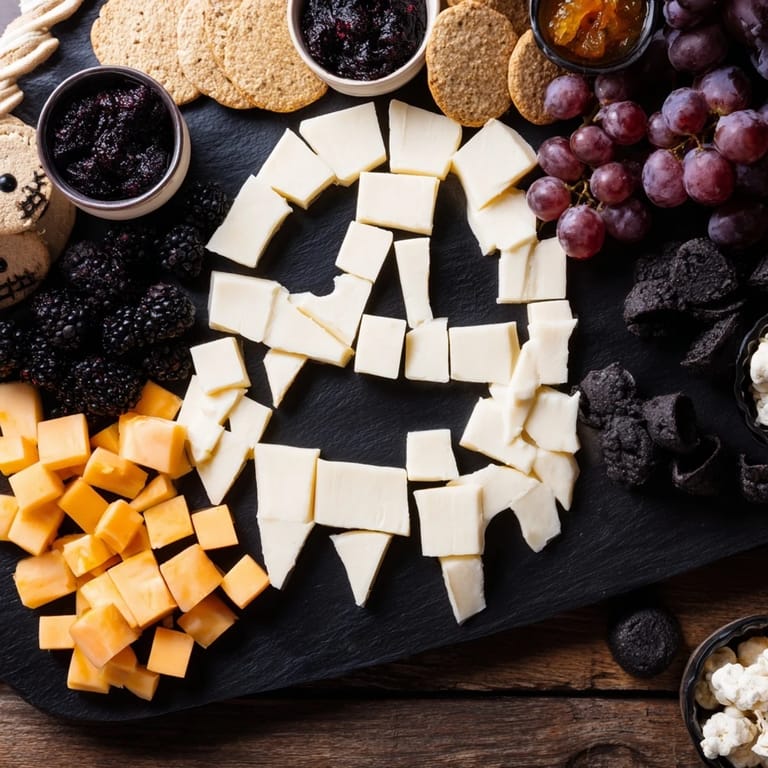
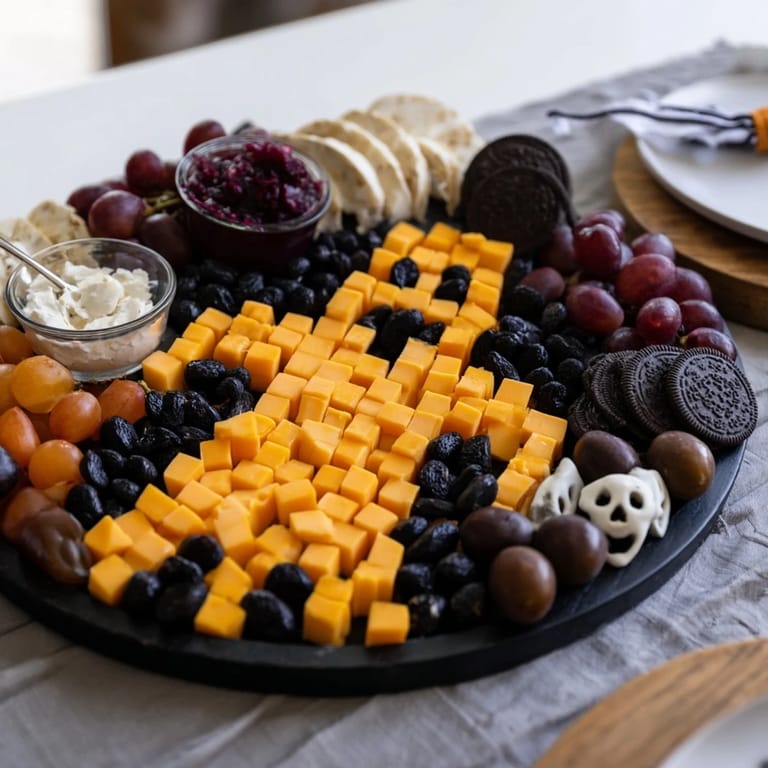
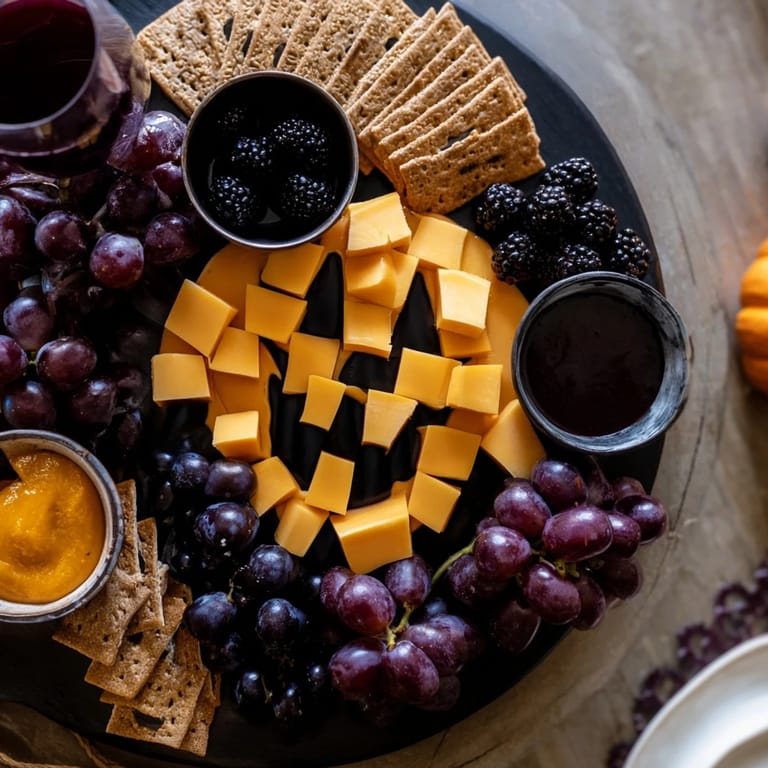
 I'll never forget the year my neighbor showed up to our Halloween gathering with a charcuterie board that made everyone gasp—not just because it was delicious, but because right there in the center, arranged with pure artistry, was a ghostly silhouette staring back at us. I'd always thought charcuterie boards were just about throwing things together, but watching guests lean in to admire the careful arrangement before digging in, I realized this was edible art. Since then, I've been obsessed with creating my own spooky versions, and honestly, it's become the dish people ask me to bring every October.
The first time I made this for my daughter's Halloween party, I was honestly nervous about whether kids would care about the presentation. But I watched them gather around, pointing out the ghost's shape, and then carefully selecting pieces to keep the outline visible. One kid even said it was too pretty to eat—until it obviously wasn't. That moment taught me that food becomes memory when we invest a little artistry into it.
Ingredients
- Activated charcoal cheddar or black waxed cheese (150 g), cubed: This is your darkest anchor—the deep black of this cheese is what makes your ghost outline pop. I learned to buy it a few days ahead because good specialty shops sometimes run low before Halloween
- Aged gouda (150 g), sliced: The golden undertone here creates beautiful contrast against the dark ingredients. Its mild sweetness keeps everything from feeling too heavy
- Brie (150 g), cut into wedges: The soft creamy one—arrange these near your darker elements so the pale color reinforces that spooky silhouette
- Soppressata (100 g), sliced: If you're including meat, slice it thin and let it curl slightly as it sits. The deep red becomes almost black against lighter elements
- Prosciutto (100 g), folded: This adds delicate folds that catch the light beautifully. I learned to fold these just before serving so they don't dry out
- Black sesame crackers (100 g): These are textural gold—dark and dramatic, and they hold up well under toppings without breaking
- Pumpernickel bread (100 g), sliced: Dense, dark, and intentional. Cut these a little thicker than you think you need so they feel substantial
- Black grapes (1 cup): Your secret weapon for filling tight spaces while maintaining that dark outline. They roll slightly, so position them last
- Blackberries (1 cup): Delicate and jewel-like. Add these near the end because they bruise if handled too much during arrangement
- Dried figs (1/2 cup), halved: These add visual interest and a sophisticated sweetness. I slice them just before serving so they don't oxidize
- Black olives (1/2 cup): Use the good ones—the meaty kind that don't taste like tin. They're your reliable dark anchors in awkward spaces
- Purple carrots (1/2 cup), sliced: A surprising pop of color that edges toward that spooky palette. Slice them thin so they feel delicate
- Black olive tapenade (1/2 cup): This is umami depth in a bowl. I always make or buy it the day before so flavors meld
- Blackberry jam (1/2 cup): Choose one with visible seeds for that artisanal look. The slight tartness balances rich cheeses beautifully
- Rosemary sprigs: A friend taught me to lightly torch these for a second—it releases oils and makes them smell incredible when guests lean in
- Edible flowers (dark or purple, optional): These are the finishing flourish. I source pansies or violas from farmers markets, not grocery stores, for better color and flavor
Tired of Takeout? 🥡
Get 10 meals you can make faster than delivery arrives. Seriously.
One email. No spam. Unsubscribe anytime.
Instructions
- Set your stage:
- Choose your board—dark is essential here, whether that's black slate, a dark wood board, or even a deep charcoal ceramic plate. Place it on your work surface where you have good light and room to step back and see the full picture. Use a small bowl or cut a simple ghost or bat shape from parchment paper as your guide. Lightly outline it with your finger so you know where your negative space needs to be. Don't press hard; you just need to remember where the magic happens.
- Build your shadow:
- Start with your darkest elements arranged densely around that outlined silhouette. This is where the activated charcoal cheese, black grapes, blackberries, and black olives create the visual boundary. Work slowly, stepping back every few moments to see how the outline is emerging. Think of it like you're painting with food—the dark ingredients are your shadow, defining the ghost or bat before anything else is even placed.
- Honor the empty space:
- This is the hardest part, but it's everything. Resist the urge to fill that center space. The negative space is what makes the shape visible. I learned this the hard way my first year when I filled everything and lost the silhouette entirely. The board showing through is not a gap—it's the revelation.
- Create your landscape:
- Now fill the rest of the board with everything else, working outward from your ghost outline. Arrange your golden gouda, creamy brie wedges, sliced soppressata and prosciutto, crackers, and bread. Think about color flow—let warm golds and creams drift away from the dark center. Tuck dried figs into any gaps. Let things overlap naturally, like you're not overthinking it.
- Set your dips:
- Place small bowls of tapenade and jam at the corners or edges of the board. These anchor the composition and give guests a clear starting point for pairing suggestions. I prefer ceramic bowls that feel intentional rather than generic serving dishes.
- Finish with finesse:
- Fill any remaining small gaps with additional grapes, olives, or a few more berries. Scatter rosemary sprigs with intention—not random, but placed like you're highlighting certain areas. Add edible flowers last, placing them where they'll catch the eye without obscuring your silhouette. Step back and take a moment to admire what you've created before serving.
- Present with presence:
- Bring this to your table and let it sit for a moment before people start selecting. There's something special about that pause where everyone sees the ghost or bat before the mingling begins. Once people start eating, the arrangement will naturally shift and change—and that's okay. You've already captured the magic in that first moment.
 Pin It
 Last Halloween, my oldest friend came to the party and immediately recognized the ghost shape without anyone pointing it out. She stood there for a moment, then looked at me and said, "You made food into art," and something just clicked about why I keep doing this. It stopped being about impressing people and became about the simple joy of creating something that makes someone pause and really see it.
The Psychology of Negative Space
I used to think emptiness on a platter was wasted space, but negative space is actually where the eye rests and where meaning emerges. It's the difference between a board and a vision. When you leave that ghost or bat shape empty, your brain fills in the outline automatically—it's almost an optical illusion, and it's why people get so delighted by this board. The arrangement stops being just ingredients and becomes a complete picture.
Playing With Color Theory
This board works because of color contrast and temperature. The dark ingredients around the outline are cool and saturated, while the golden goudas and pale bries radiate warmth as they move outward. Purple carrots bridge that gap beautifully. If you understand that you're creating a color journey from dark and mysterious to warm and inviting, you can adapt the ingredients based on what you can find locally and still achieve that same impact.
Making It Your Own
The beauty of this concept is that it's endlessly adaptable. I've made vegetarian versions that look just as stunning using seeds, nuts, and plant-based cheeses. I've made gluten-free versions that nobody could tell were any different. The silhouette shape is your canvas—make it a ghost, a bat, a pumpkin, or even a skull. The principles stay the same: dark outline, light fill, intentional empty space, and the willingness to let the board's surface tell part of the story.
- Test your silhouette idea on paper first—even a quick sketch helps you understand the proportions before arranging real food
- Prep all your ingredients before you start arranging; once you begin, you want to move with intention, not scramble for sliced cheese
- Keep your hands clean and dry—greasy fingers will move things around unintentionally and mess up your carefully planned arrangement
 Pin It
 Every time I make this board, I'm reminded that the most memorable food experiences aren't about complexity—they're about intention and a willingness to see your ingredients as more than sustenance. This board is proof that a little artistry transforms a gathering.
Recipe FAQs
- → How do I create the ghost silhouette on the board?
Use a stencil cut from parchment paper to outline the ghost or bat shape on a dark serving board. Arrange ingredients densely around this outline, leaving the center empty to reveal the silhouette.
- → Can I make this board vegan-friendly?
Yes, substitute plant-based cheeses and omit the meats. Use vegan crackers and breads to maintain dietary preferences.
- → What ingredients give the board its dark colors?
Activated charcoal cheddar, black grapes, blackberries, black olives, and black sesame crackers create the deep, moody colors essential for the silhouette effect.
- → How long does assembly take?
Preparation takes about 30 minutes, with no cooking required. Arranging ingredients carefully around the stencil is key to achieving the desired effect.
- → What drinks pair well with this board?
Dark red wines or spiced ciders complement the rich and savory flavors, enhancing the Halloween gathering experience.