 Pin It
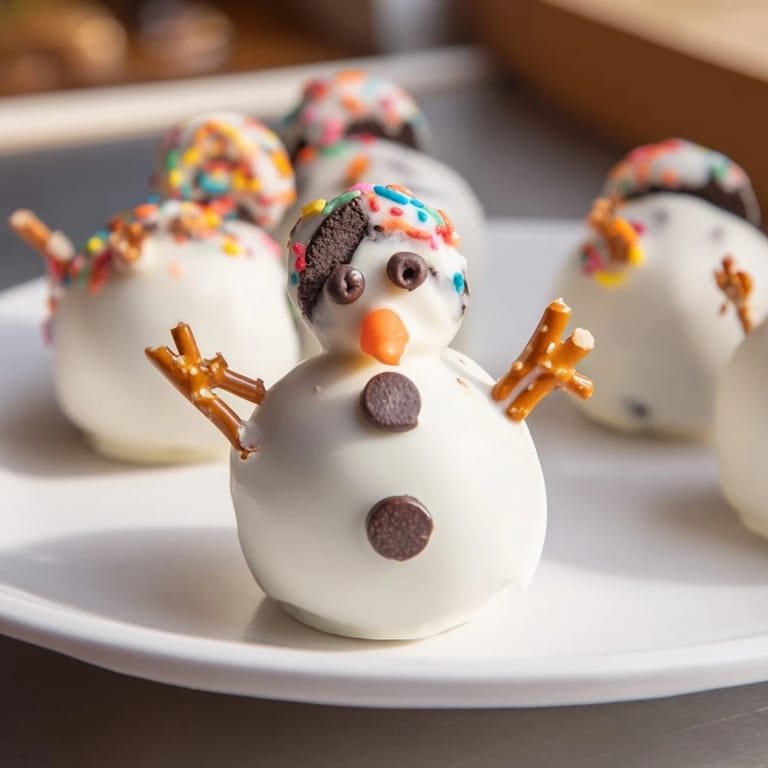
 My kids were bouncing off the walls one December afternoon, and I needed something festive to keep their hands busy and their mouths happy. I remembered seeing these adorable little snowmen at a winter market years ago and thought, why not make them at home? Crushed Oreos mixed with cream cheese seemed almost too easy, but the moment I shaped that first snowman and saw their eyes light up, I knew I'd stumbled onto pure magic. These cake pops became our thing that year—we made dozens, decorated them like tiny characters, and they were gone within days.
The real turning point came when I brought a box to my office holiday party. I watched people's faces soften when they picked one up—suddenly these weren't just treats, they were little works of art that felt personal. Someone asked if I sold them, and that's when I realized the magic wasn't in complexity; it was in the care you could see in every tiny detail.
Ingredients
- Oreo cookies: Use a full standard package (36 cookies)—the filling and wafers together create that perfect dark-sweet base that balances the cream cheese.
- Cream cheese, softened: This is your binder and the secret to making the dough hold together without being greasy; let it sit on the counter for 20 minutes before mixing.
- White chocolate or candy melts: Candy melts are easier to work with because they don't need tempering, but real white chocolate tastes better if you're patient with it.
- Mini chocolate chips or black decorating gel: These become the eyes and buttons—the gel is neater if you're shaky with your hands, but chips feel more rustic.
- Orange sprinkle or colored icing: A tiny pinch of orange makes the perfect carrot nose; regular food coloring mixed with a tiny bit of icing works in a pinch.
- Pretzel sticks or fondant: Pretzels add a salty contrast and crunch; fondant is easier to shape and sticks better if you tie it around the middle.
- Lollipop sticks: These keep everything together and make them fun to hold—get ones that are food-safe and sturdy enough not to bend.
Tired of Takeout? 🥡
Get 10 meals you can make faster than delivery arrives. Seriously.
One email. No spam. Unsubscribe anytime.
Instructions
- Crush your cookies into magic:
- Pulse your Oreos in a food processor until they look like dark sand, not fine powder—you want a little texture. If you don't have a processor, seal them in a bag and go to town with a rolling pin while imagining all your stress is in those cookies.
- Mix into a smooth dough:
- Combine your crushed Oreos with room-temperature cream cheese and stir until it forms a uniform, almost moldable paste. If it feels too wet, let it chill for 5 minutes; if it's crumbly, the cream cheese probably wasn't soft enough.
- Roll two sizes of balls:
- Make 16 larger balls (about the size of a walnut) and 32 smaller ones (about the size of a marble). This might seem fussy, but it's what makes them look like proper snowmen instead of blobs.
- Stack and secure:
- Place one small ball on top of one large ball and press gently to stick them together. Push a lollipop stick through the center of both, then lay them on a parchment-lined sheet and pop the whole thing in the freezer for at least 20 minutes—they need to be completely firm or they'll fall apart when you dip them.
- Melt your coating:
- Heat your white chocolate in 30-second bursts in the microwave, stirring between each one, until it's smooth and pourable. If it starts to seize and looks grainy, add a teaspoon of coconut oil and stir it smooth again.
- Dip with confidence:
- Take one frozen pop and gently dip it into the melted chocolate, rotating slowly so it coats evenly. Let the excess drip off for a second or two, then stand it upright in a styrofoam block, a mug, or even a potato to set.
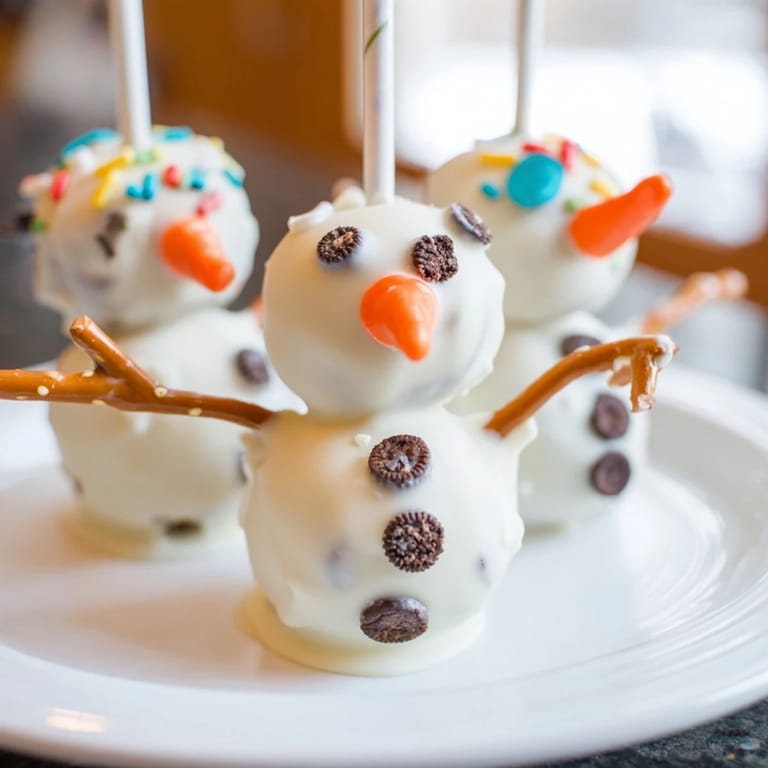
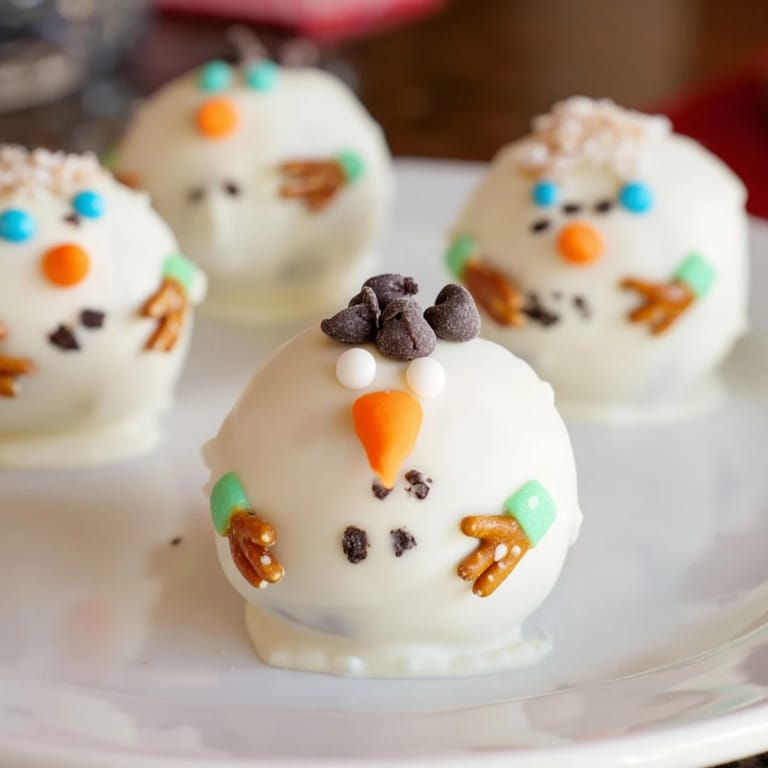
- Decorate while still tacky:
- Before the chocolate sets, stick on your chocolate chips for eyes, press on tiny dots of black gel for buttons, and add your orange nose. The warmth of the melted chocolate helps everything stick without needing extra adhesive.
- Add the finishing touches:
- Once the chocolate is set, tie pretzel pieces around the middle for arms or wrap a tiny fondant scarf around the neck. These details are what make each one feel special and one-of-a-kind.
 Pin It
 There was one moment when my nephew, who was skeptical about my cooking, took a bite of one and his whole expression changed—the crunch of the Oreo, the sweetness of the chocolate, the way everything came together. He asked for three more, and I realized these little snowmen had bridged some kind of gap between us.
Making Them Without a Food Processor
Not everyone has kitchen gadgets, and honestly, crushing Oreos by hand is kind of therapeutic. Put them in a sturdy zip-top bag, seal it tight, and go to town with a rolling pin, the bottom of a glass, or even your fist if you're feeling it. You might even get better texture control this way because you can feel when you've reached that perfect sandy consistency. The whole process takes maybe five minutes and feels oddly meditative once you get into the rhythm.
Storage and Make-Ahead Magic
These are ideal for advance planning because you can freeze the undecorated pops for up to two weeks, which means you can decorate them the day before a party when you're fresher. Once decorated, keep them in an airtight container in the fridge for up to five days—they'll stay firm and perfect. If they start to soften, pop them back in the freezer for 10 minutes to re-set the chocolate.
Flavor Variations and Creative Ideas
After making dozens of these, I started experimenting with tweaks that kept things interesting. You can swap in crushed Thin Mints, Golden Oreos, or even birthday cake cookies if you want something different. Some years I've dyed the white chocolate coating with gel food coloring to make pastel snowmen, added edible glitter for sparkle, or used colored fondant to create scarves that actually looked like tiny knitwear. The beauty of this recipe is that once you've nailed the basic technique, you can let your imagination run completely wild.
- Try mixing crushed candy canes into the dough for a minty twist that tastes like winter.
- Use dark chocolate or milk chocolate for the coating if white chocolate isn't your thing.
- Make tiny top hats from fondant or little scarves that actually wrap around their necks for extra character.
 Pin It
 These little snowmen have a way of turning an ordinary afternoon into something memorable, whether you're making them alone or surrounded by chaos and laughter. That's the real magic, honestly.
Recipe FAQs
- → How do I crush Oreos without a food processor?
Place the Oreos in a zip-top bag and gently crush them with a rolling pin until finely ground.
- → What type of cream cheese is best for mixing with Oreos?
Use softened, full-fat cream cheese to ensure a smooth dough and rich texture.
- → Can I use other coatings besides white chocolate?
Yes, candy melts or colored chocolate can be used to create different looks and flavors.
- → How should I store these snowman treats to keep them fresh?
Keep them in an airtight container in the refrigerator for up to 5 days to maintain freshness and texture.
- → What are some decoration tips for eyes and buttons?
Mini chocolate chips or black decorating gel work well for eyes and buttons, adding charming details.
- → Is chilling necessary before coating?
Yes, freezing assembled pops for about 20–30 minutes helps them hold their shape during coating.