Pin It
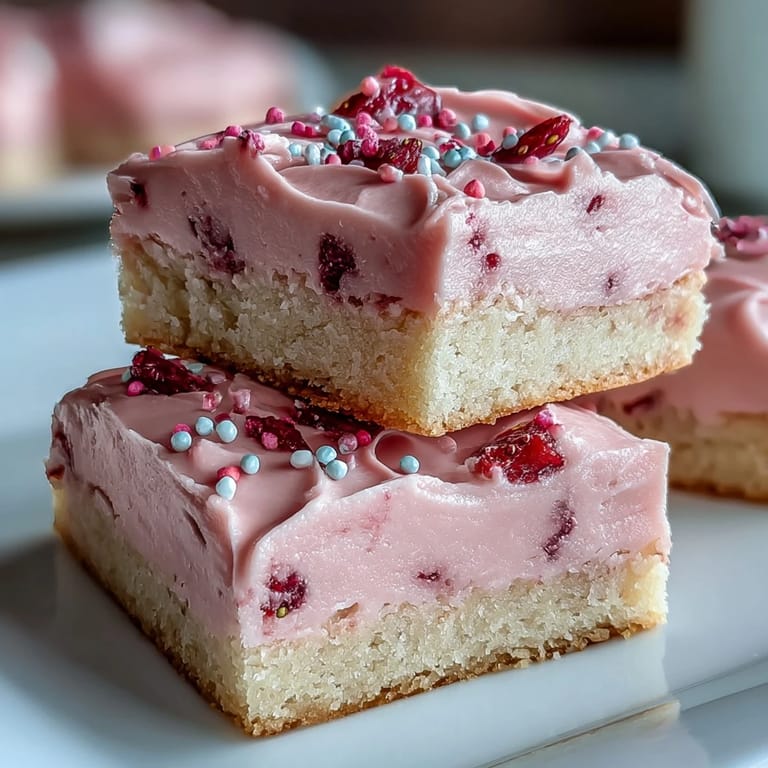
 My sister texted me a photo of her kitchen covered in pink—Valentine's Day prep gone slightly chaotic—and asked if I had something foolproof to bake. These sugar cookie bars arrived in my mind fully formed, the kind of recipe that feels like a warm hug tastes like butter and strawberries, and honestly never fails. There's something about spreading that rosy frosting over soft, buttery layers that makes even the smallest kitchen feel like a candy shop.
I made these for a February potluck once, worried they'd be too delicate to transport, and watched people's faces light up when they bit through that frosting into the tender cookie base. One friend asked for the recipe immediately, claiming she'd never had anything taste so effortlessly elegant, and I realized then that simplicity done right is what people actually remember.
Ingredients
- Unsalted butter (1 cup, softened): This is your foundation—it needs to be soft enough to cream easily, so pull it from the fridge about 30 minutes before you start, not straight from cold storage.
- Granulated sugar (1 1/4 cups): The sugar creams with butter to trap tiny air pockets that keep these bars tender rather than dense.
- Large eggs (2, room temperature): Room temperature eggs blend smoothly into the butter mixture without creating lumps or streaks.
- Pure vanilla extract (2 teaspoons): Skip the imitation here—you taste it directly, and real vanilla makes a quiet but noticeable difference.
- All-purpose flour (2 1/2 cups): Measure by spooning into your cup and leveling off rather than scooping straight from the bag, which packs it down and makes things dry.
- Baking powder (1/2 teaspoon): This gives just enough lift to keep the bars cake-like rather than dense and hard.
- Salt (1/2 teaspoon): Salt in baked goods doesn't taste salty—it amplifies sweetness and makes flavors pop.
- Unsalted butter for frosting (1/2 cup, softened): Use the same softness standard as the dough butter, and make sure it's unsalted so you control the salt level.
- Powdered sugar (2 1/2 cups, sifted): Sifting removes lumps that would create gritty frosting; don't skip this step, it takes two minutes and changes everything.
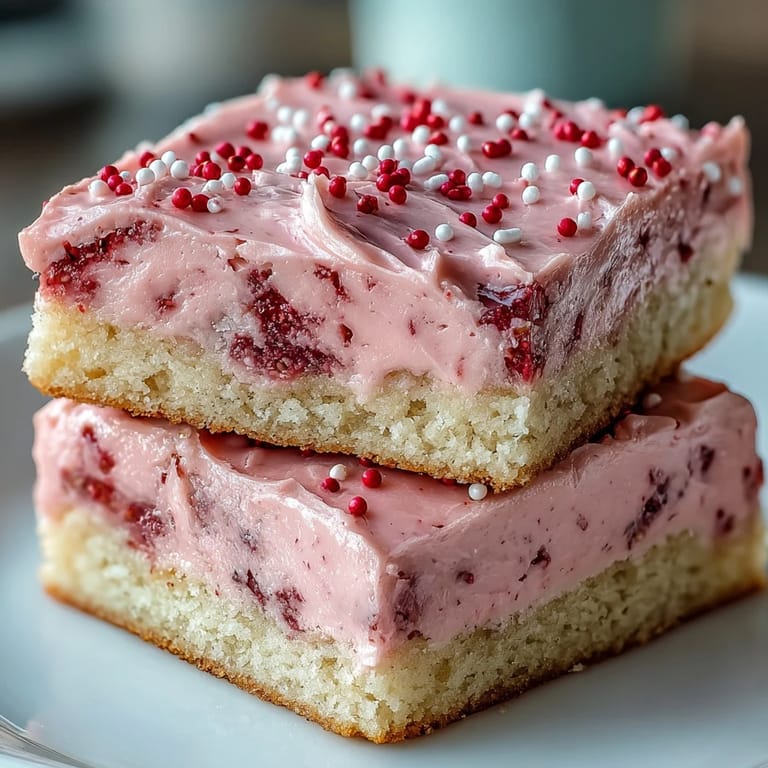
- Freeze-dried strawberries (3 tablespoons, crushed to powder): These are concentrated flavor without moisture—pulse them until they look like fine dust, almost like cocoa powder texture.
- Milk or cream (2-3 tablespoons): Start with less; you can always add more to reach the right spreadable consistency.
- Pure vanilla extract (1/2 teaspoon for frosting): A smaller amount here prevents the frosting from tasting vanilla-forward instead of strawberry-forward.
- Sprinkles (pink or red, optional): These are purely joy—use them if you want a little celebration scattered across the top.
Tired of Takeout? 🥡
Get 10 meals you can make faster than delivery arrives. Seriously.
One email. No spam. Unsubscribe anytime.
Instructions
- Heat the oven and prep your pan:
- Set your oven to 350°F and line your 9x13-inch pan with parchment paper, making sure the paper comes up the sides and overhangs slightly—this makes removing the whole sheet so much easier than trying to wrestle it out. It's a small detail that saves frustration.
- Cream butter and sugar until fluffy:
- Beat them together for 2-3 minutes until the mixture looks pale and fluffy, almost like frosting itself—this is where you're building the tender crumb. If your mixer is loud and the mixture transforms from yellow-tan to pale, you're there.
- Add eggs and vanilla one at a time:
- Add each egg fully and let it incorporate before adding the next one, then mix in the vanilla. This prevents curdling and keeps everything smooth.
- Combine dry ingredients in a separate bowl:
- Whisk the flour, baking powder, and salt together so the leavening is evenly distributed throughout the dough. Takes thirty seconds and prevents pockets of density.
- Fold wet and dry together gently:
- Add the dry mix to the wet mix and stir just until you don't see any white streaks of flour—this is crucial. Overmixing develops gluten, which makes bars tough instead of tender.
- Spread and bake:
- Press the dough evenly into your pan (a light spray of cooking oil on your spatula keeps it from sticking) and bake for 18-20 minutes until the edges are golden and the center looks just set, not jiggly. The bars will firm up as they cool, so slightly underdone is better than overbaked and dry.
- Cool completely before frosting:
- Let them sit in the pan on a wire rack until they're completely cool—rushing to frost warm bars means the frosting will melt and slide around. I've learned this the hard way.
- Prepare the frosting base:
- Beat the softened butter in a medium bowl until it's smooth and creamy, about a minute, then add the sifted powdered sugar, crushed freeze-dried strawberry powder, vanilla, and salt. Beat until everything is combined and fluffy.
- Add milk gradually and reach the right consistency:
- Add milk or cream one tablespoon at a time, beating between additions, until the frosting is creamy and spreadable but not thin. The consistency should be like butter-based frosting, holding peaks but not stiff.
- Frost and decorate:
- Spread the frosting evenly over the cooled bars using a spatula or knife, then scatter sprinkles across the top if you like. Let it set for a few minutes before cutting.
- Cut into squares and serve:
- Use a sharp knife (dip it in hot water between cuts if frosting is sticky) to cut into sixteen squares. Wipe the knife clean between each cut for neat edges.
 Pin It
 My neighbor knocked on my door one February evening asking if she could buy some of these from me, and I froze—I'd never thought of them as anything you'd sell, they were just something I made. Now I make a double batch on Valentine's Day, keep some, and give her a box because some recipes become small traditions without you planning it.
Why Freeze-Dried Strawberries Make All the Difference
Fresh strawberries have too much water content and would make your frosting wet and separate; freeze-dried ones are concentrated flavor. I once tried making a version with strawberry jam instead because I was out of freeze-dried, and the frosting tasted jam-forward instead of strawberry-subtle, with a weird gelatinous texture. The freeze-dried version is light pink, naturally flavored, and stays creamy, which is why it works.
Storage and Make-Ahead Magic
You can bake the cookie layer a day ahead and frost it the morning you're giving them away, which spreads the effort. The unfrosted bars actually freeze beautifully for up to two months, so baking a double batch in January and pulling them out for February gatherings is entirely reasonable.
Small Details That Matter
Room temperature eggs blend seamlessly into the butter while cold eggs create little streaks and lumps. Sifting the powdered sugar only takes two minutes but prevents gritty frosting. The parchment overhang means you can lift the entire sheet out instead of trying to cut squares inside the pan, which risks tearing the edges.
- If the frosting is too thin, refrigerate it for 10 minutes and it will firm up enough to spread evenly.
- For a deeper pink without artificial dyes, add one small drop of natural food coloring and stir—a little goes a long way.
- A serrated knife works better than a chef's knife for cutting through the frosting layer without dragging.
 Pin It
 These bars taste like someone spent hours making them when really you've invested maybe 20 minutes of hands-on time. That's the real magic—something this soft, this strawberry-pink, this deeply good, arriving from a recipe that's honest and unfussy.
Recipe FAQs
- → What makes the strawberry frosting flavorful?
The frosting includes freeze-dried strawberry powder which delivers a natural, intense strawberry flavor without adding extra liquid.
- → How do I prevent the bars from overbaking?
Bake until the edges are lightly golden and the center is just set, about 18-20 minutes, then cool completely in the pan.
- → Can I prepare the bars ahead of time?
Yes, the bars can be stored airtight at room temperature for 2 days or refrigerated for up to 5 days. They also freeze well for up to 2 months.
- → What is the best pan to use for these bars?
A 9x13-inch baking pan lined with parchment paper helps ensure easy removal and even baking.
- → How is the texture of the cookie bars described?
The bars are soft and buttery, with a tender crumb and a creamy, spreadable frosting on top.